Showing posts with label christmas. Show all posts

Friday, November 26, 2010

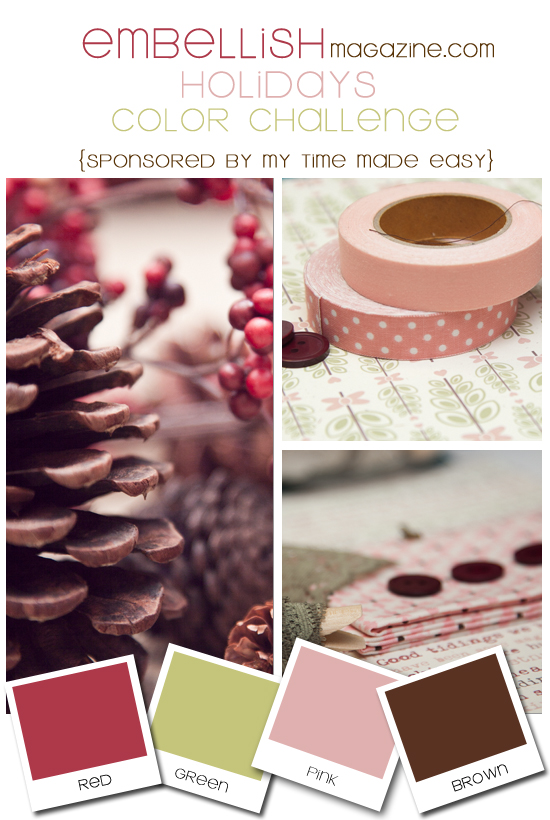
Embellish Magazine Holidays Color Challenge

I adore this color combination From Embellish Magazine!

 This is my first time playing this challenge, and I was so inspired by the color choices!


I don't know this made me think of circles but it did!  I used SU's Early Expresso, Regal Rose, Cherry Cobbler, and Certainly Celery.  The rhinestone circles are from Michaels; the sentiment is K&Co.; and I used Spellbinders to cut the tag for the sentiment.

 I love these glittery greetings!  What's great is you get several strips in the package so you can make many cards with just one package.
This is my new favorite way to make a bow.  Easy, quick, and very polished results!  My kinda technique!

I had a lot of fun with this challenge!  Thanks for looking - leave a comment!

Sunday, November 14, 2010

Silhouette Ornaments

As we draw closer to Christmas, I'm finishing up some projects that I started over the summer.  My intention was to get an early start on handmade Christmas presents but alas, it didn't work out the way I planned!  Oh well - at least I finished it before the holiday!

I usually give the grandparents a framed picture of my daughter but after seeing this fabulous idea on Roots & Wings, I knew this year would be different!

So I purchased 4 wooden circles, a remnant of Christmas-y material, red paint, and some Modge Podge and went to work!

First, I painted the circles red.  While they were drying, I cut 4 circles from the material.  Then I glued the material on to the circles.  I drilled small holes in the top of the ornament and set an eye hook for the hanger.

The hardest part of this whole project was getting my child to sit still long enough to get a decent side photo!  It happened at the zoo one day, as she was watching the lions sleep.  Very exciting stuff.
It wasn't the best photo, but it was all I had to work with!  I cut the size down about 75%, printed it out, and then used a black marker to color it in so I could get a good perspective on what it would look like as a silhouette.  I had to reposition her head a little since she was looking down, but after about 4 iterations, I finally came up with a silhouette I was happy with.

Roots & Wings suggests painting your silhouette directly on your material, but I stink at painting so I decided to cut mine out of black cardstock.  So I traced my pattern silhouette 4 times and cut them out.  Then I glued the silhouettes on each of the circles and covered in a good coat of Modge Podge.
I thought it wasn't quite finished with just the coat of Modge Podge, so I decided to pour a thin coat of resin on just the top.  It makes it feel more finished to me.  Plus, I like the shiny top coat!  I added a gold cord for the hanger.

The only other thing I added to my ornament was my daughter's name, age, and the year to the back of the ornament (all covered with Modge Podge).

I think this is a nice keepsake that the grandparents are going to love!

Friday, November 12, 2010

Yarn Wreath, Part 1

I was inspired to make my own yarn wreath by the great selection on Etsy, especially the ones created by KnockKnocking.  I love her whimsical style and funky colors!

I found a great tutorial at The Constant Gatherer and got to work.  I bought a straw wreath and some pretty holiday yarn and set to work.  I wrapped mine first with batting but skipped the tulle.  Then I started wrapping with yarn.  I used a red and green mix with gold thread running through it.  It is soft and has lots of great texture.  It took maybe 2/3 of the skein to finish wrapping the wreath.

Once I was done wrapping with the yarn, it was time to dress it up!  I made these cute little ruffle flowers from white felt by cutting 1/2 strip length-wise.  
I ran a basting thread near the bottom and pulled to create a ruffle, then curled it around on itself.  I secured the edges with a little hot glue. I grouped 3 of them together on the bottom left of the wreath.

I added a faceted red plastic bead to the centers of the flowers (also with hot glue), then glued a pretty little red bird and some greenery to the top of them, creating the focal point for my wreath.
I made a simple bow from some of the yarn and glued that to the top of the wreath, finishing it off with another white felt flower.
 
It took about an hour to wrap the wreath and maybe another hour to decorate it.  I love the way it turned out!  Festive, old-fashioned, but stylish.  And I had a great time making it.  In fact, I loved making it so much that I whipped up another one tonight.  I'm not quite done with that one, but I'll post pictures once I finish.